
BCI with Entrainment
TLDR; Brain control interface (BCI) app using entrainment.
This is the final post on entrainment, which is a culmination of the work explained in creating a visual stimulus, entrainment analysis part I, and entrainment analysis part II. As a final recap, the goal for this experiment was to watch a video on a computer screen that flashes essentially a strobe light at a defined frequency such as 10 or 12hz and then be able to detect the entrained brainwaves in the EEG recording. If we can detect a signal in our brainwaves, we can use it to issue commands.
Now that we can detect a 10 and 12hz signal with reasonably high fidelity, we can create a quick demo to demonstrate our new brain computer interface (BCI). A colleague suggested making something move across the screen so that’s what I went with. At a high level, I created a Flask app that handles streaming EEG data, and based on the signal that it detects, it moves yet another colleague’s CAT across the screen to the left or to the right. I could spend days tweaking this to make it better but the important thing is that it works and we learned a tremendous amount about the dynamics of the EEG signal in the process. After confirming our setup, we’re ready to move on to some machine learning experiments, but I digress.
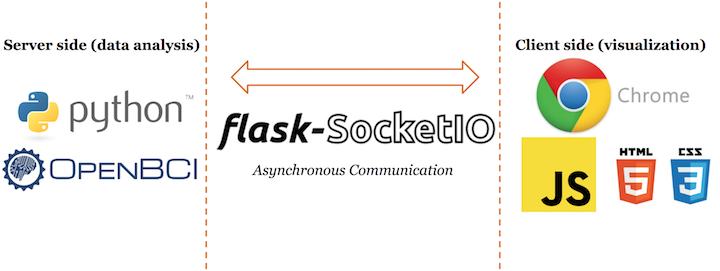
To summarize, the EEG headset is connected my local computer. It streams data to Python/Flask. I run an FFT on small segments (remember the tape reel analogy?) and try to detect the signal that I’m looking for. If I detect it, I send a signal to the client side visualization and move the cat using javascript/jquery/html.
In order to make this work, I had to use a websocket to handle the streaming of information from the server (my local machine running the Flask app) to the client (Chrome). The Flask-socketio package was pretty intuitive and it’s documentation was solid. In the process of creating this app, I learned an incredible amount about the canonical client-server architecture and how you ideally want to offload some processes to the client side (say I productionized this, it would be paramount that I could capture the EEG steam in javascript on your machine, not mine).
I also now better appreciate the challenge of trying to run multiple things simultaneously (e.g. stream the EEG, process the signal, interact with the client). Streaming, processing, and interacting with the client really need their own threads and even more than that, you need to ensure that long-running processes like processing an EEG signal don’t hog all the CPU time, which is where sleeper functions come in. At first, my app handled one thing at a time - streaming, processing, or interacting with the client - but not all of them! After employing threading and sleeper functions, these problems went away.
As I’ve mentioned before, toy problems help you understand something before you go for a hail mary. The first app I created didn’t even bother with the EEG headset. Rather, I used an audio signal to nail the real-time streaming and visualization aspects before adding in the complication of an IoT device and noisy data source. The dynamics are exactly the same. Audio comes in a waveform in the same way that an EEG signal does, so if we can detect a frequency from an audio stream, we can do the same for an EEG stream just by simply swapping out the stream and signal we’re looking for. You can even run that toy example on your machine by checking out the code in my github repo.
Our tutorial wouldn’t be complete without looking at some code. I want to show you the workhorse functions of the app.
def freq_filter(freqs, power, min_freq=10.0, max_freq=10.5):
    """Allows you to filter down to a frequency band and returns the average."""
    condition = (freqs <= max_freq) & (freqs >= min_freq)
    indices = np.where(condition)
    power = np.abs(power)
    filtered_signal = np.mean(power[indices], axis=0)
    return filtered_signal

def fft(data):
    """Fast Fourier Transform of the signal and emission to the client side based on the signal detected"""
    data = data * np.hanning(len(data)) # smooth the FFT by windowing data
    fft = abs(np.fft.fft(data).real) / fft_size
    fft = fft[:int(len(fft)/2)] # keep only first half due to the nyquist frequency
    freq = np.fft.fftfreq(len(data),1/float(sample_rate))
    freq = freq[:int(len(freq)/2)] # keep only first half due to the nyquist frequency
    freq_peak = freq[np.where(fft==np.max(fft))[0][0]]

    alpha_rando = freq_filter(freq, fft, 2, 20) # used as a normalizing constant and makes
    # the detector more invariant to differences across sessions/recordings/individuals

    # may need to tune these thresholds to decrease False positives
    # 10hz detector
    if (freq_filter(freq, fft, 9.9, 10.05) / alpha_rando) > 2:
        socketio.emit('my_message', {'data': str(10)+" hz detected"})
    # 12hz detector
    elif (freq_filter(freq, fft, 11.9, 12.2) / alpha_rando) > 2:
        socketio.emit('my_message', {'data': str(12)+" hz detected"})
    # no signal detected
    else:
        socketio.emit('my_message', {'data': str(int(freq_peak))+" hz (max freq, no other signal detected)"})
    socketio.sleep() # free up the cpu
In a previous post, we talked about the freq_filter function so all I’ll say on that is that it returns 1 value, which is the magnitude of the signal at the frequency of interest. In the fft function, we take in 1,024 sample values (~4 seconds) from the EEG stream and calculate the componenent frequencies. As described in a previous post, we normalize our signal by background noise (2-20hz) so where you see if (freq_filter(freq, fft, 9.9, 10.05) / alpha_rando) > 2, we are testing if the 10hz signal has been detected by comparing it to our threshold of 2. If the signal has been detected, we want to notify the client (Google Chrome). When the client side receives the signal, a javascript function handles the data and moves the cat in the appropriate direction (10hz was left and 12hz was right). If no signal is detected, we’ll just print out the max frequency that was detected.
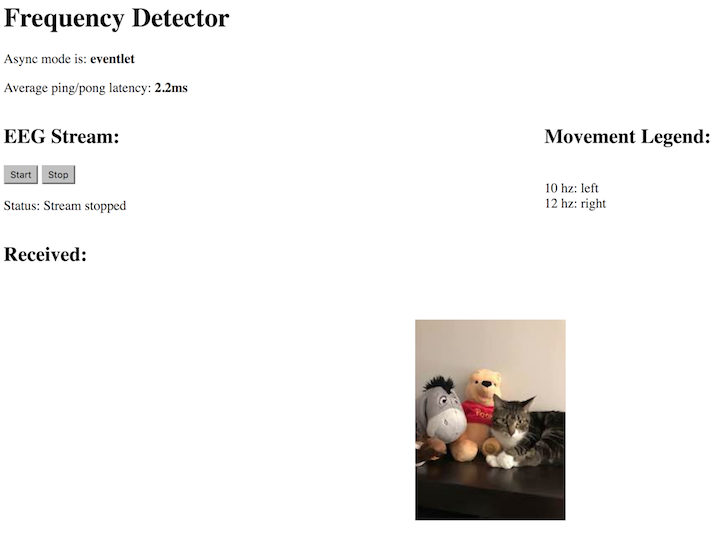
You can see the app in action here: Brain Computer Interface (BCI) using Entrainment with EEG
With all of this in place, we can now explore using machine learning with the EEG signal. One use case to explore is a brain computer interface (BCI). Namely, can we detect a thought pattern that corresponds to a color or shape in the simplest case and a decent size vocabulary in the most complex case? Another use case is mental state recognition. Can we determine how a person is responding to an advertisement or education content in broad brushstrokes? Are they engaged, bored, etc.? A final thought is can multiple sensors give us a complete picture of a person’s mental state? For example, if we fuse EEG with an activity tracker wristband (EDA/GSR, BVP, temperature, and accelerometer) can we spot correlations? These are some of the questions I’ll be exploring next. Stay tuned.


Leave a comment